 Developer Guide
Table of Contents
- Setting up
- Design
- Implementation
- Appendix A: Product scope
- Appendix B: User Stories
- Appendix C: Non Functional Requirements
- Appendix D: Glossary
- Appendix E: Instructions for manual testing
Introduction
SmartHomeBot is a desktop application tailored for users who are comfortable using a Command Line Interface (CLI), it allows users to control their smart devices at home and record all appliance power usage.
Setting up
Prerequisites
- JDK
11or above - Permission rights to create a file and folder in machine
- At least 10Mb of free space on disk
Get Started
Fork this repo and clone it into your computer.
Intellij IDEA User (highly recommended):
- Configure the JDK to JDK 11.
- Make sure you have enabled Grade extension, if disable please re-enable it back by going to
File>Settings>Plugins. - Import the project as a Gradle project by selecting build.gradle
- Verify the setup:
Run the seedu.smarthomebot.Main and try a few commands.
Run the Tests to ensure they all pass.
Design
Project overview
SmartHomeBot is built using java. SmartHomeBot can be built on any platform including Windows, MAC-OS and Linux. When running locally on these systems, SmartHomeBot has the ability to keep track of all the appliances registered into the program and control their operating systems through the program. SmartHomeBot also has a storage file that allows the saving and loading of data. This allows the SmartHomeBot to keep the information of the appliance and its parameters even after the program is turned off.
Architecture
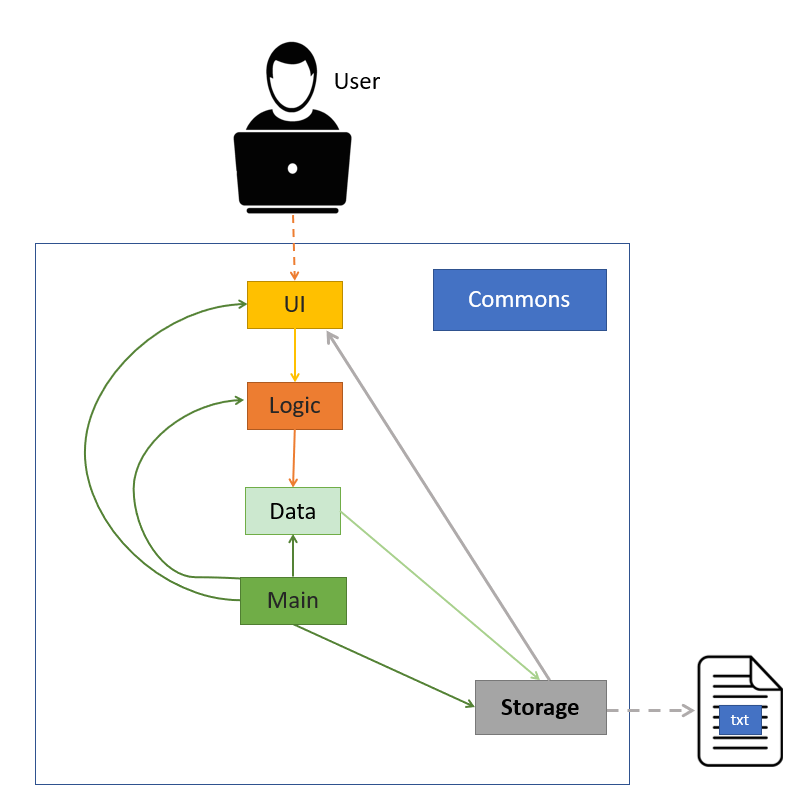
The Architecture Diagram shown above explains the high-level design of SmortHomeBot Application. Given below is a brief overview of each component.
Main is responsible for initializing other components in correct sequence, and connects them up with each other.
Commons represents a collection of classes used by multiple components.
The rest of the App consists of four components.
Ui: The user interface where user can enter instructions and view output.LogicThe command executor which consists of,Paser: Extract the keyword from user inputCommands: Execute the specific command according to the keyword
DataHolds the data in-app-memory while the program is running.StorageReads and writes data from and to a text file.
How the architecture components interact with each other
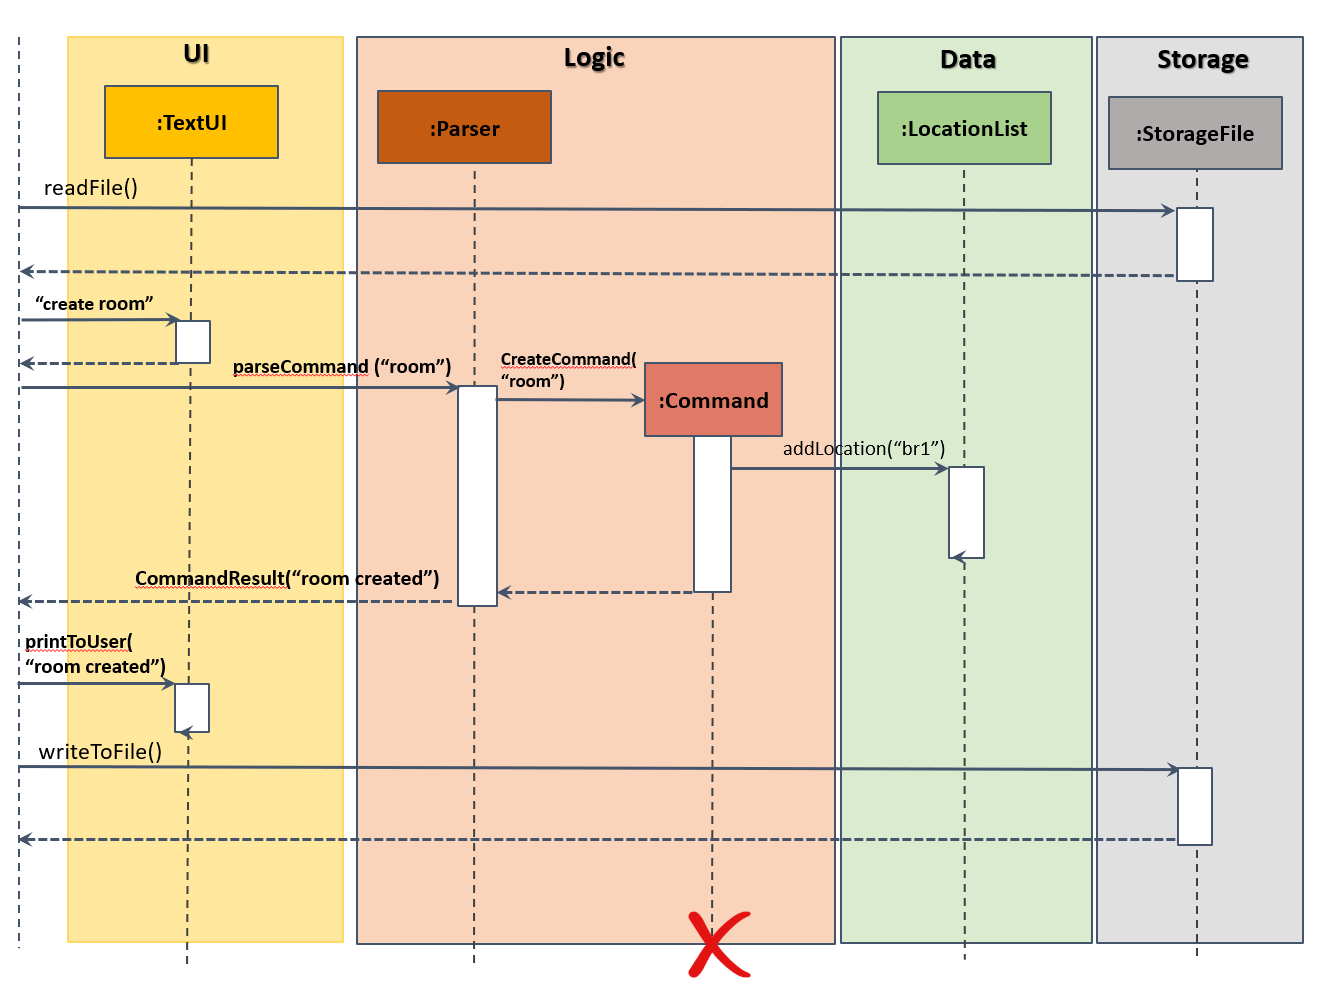
The Sequence Diagram below shows how the components interact with each other for the scenario where the user issues the command create br1.
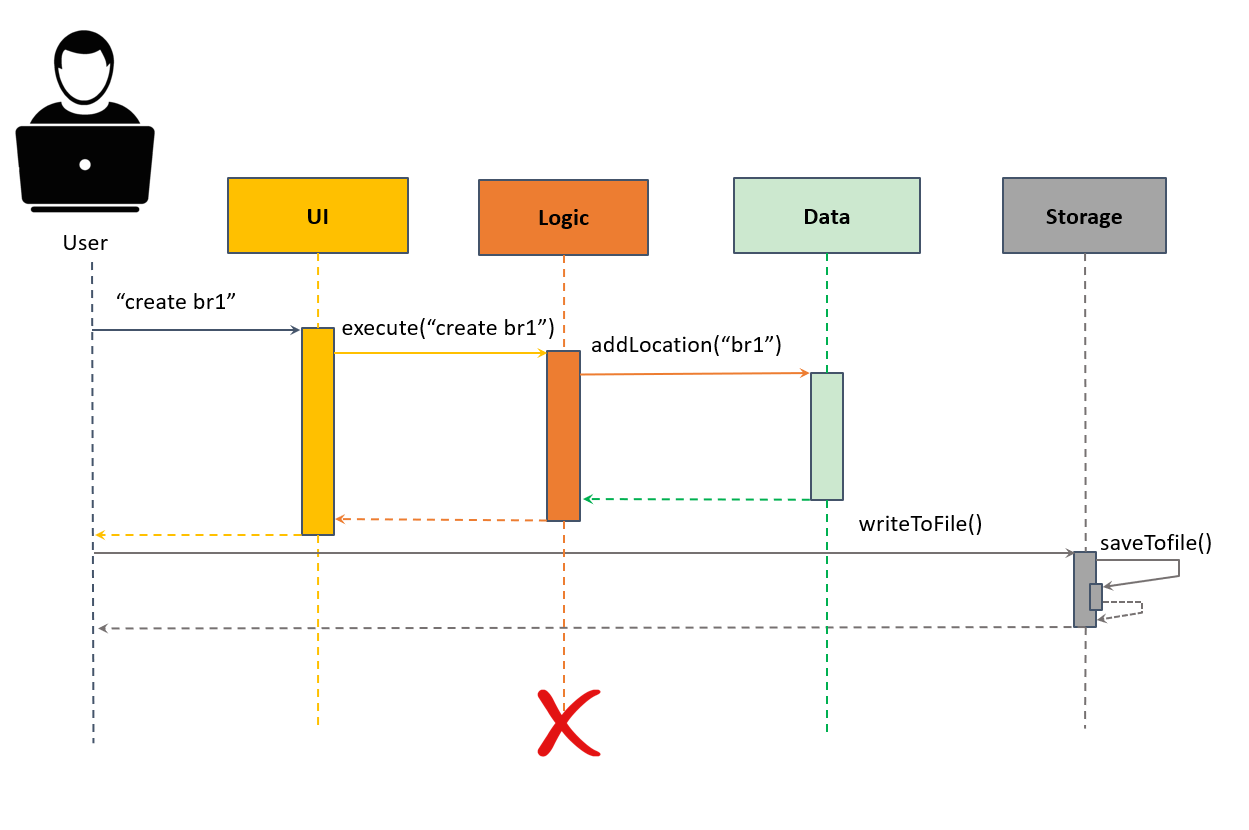
The sections below give more details of each component.
Ui Component
The class diagram of TextUi is shown below together with Main:
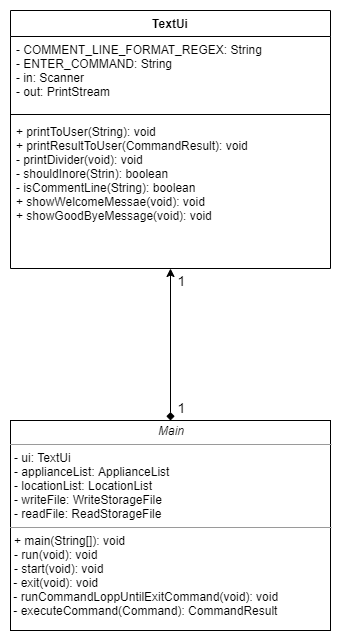
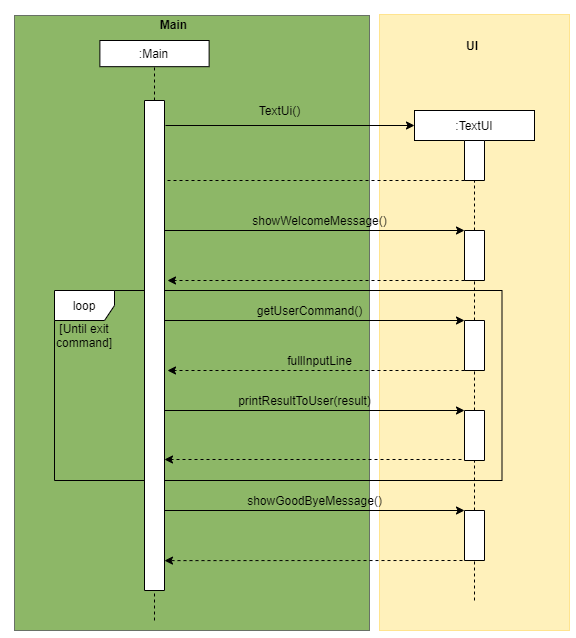
The sequence diagram of TextUi is shown below:
API : TextUI.java
The UI component which consists of TextUi,
- Prompt commands from the user.
- Execute user commands using the Logic component.
- Displays information based on changes to Data.
- Prints the SmartHomeBot appliance in a well-formatted form.
Logic Component
The class diagram of Logic Component is shown below together with an example:
API : Logic
- Logic uses the Parser class to parse the user command.
- This results in a Command object.
- The command execution can affect the Data (e.g. adding a new location “br1” into its LocationList).
- The result of the command execution is encapsulated as a CommandResult object which is passed back to the Ui.
- In addition, the CommandResult object can also instruct the Ui to perform certain actions, such as displaying help to the user.
- Shown above is the Sequence Diagram for interactions within the Logic component for the when user enter “create br1” and how the API call.
Data Component
The class diagram of Data Component is shown below:
API : Data
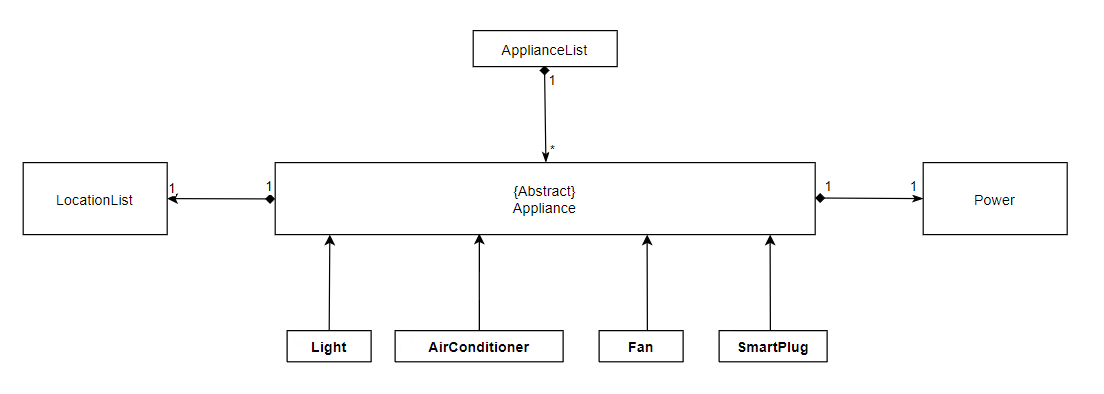
The Data Component Diagram shown above explains the high-level design of the Data which consists of LocationList which stores all the locations created by user, ApplianceList stores all the appliance which can be created from one of the types - Fan, AirConditioner,Light, or SmartPlug. Each appliance creates Power which used for computation of power usage.
Implementation
Detailed Data Component
The Detailed Data Component shown above explains the summarised data of SmartHomeBot. The four appliances classes are extended from the abstract appliance class.
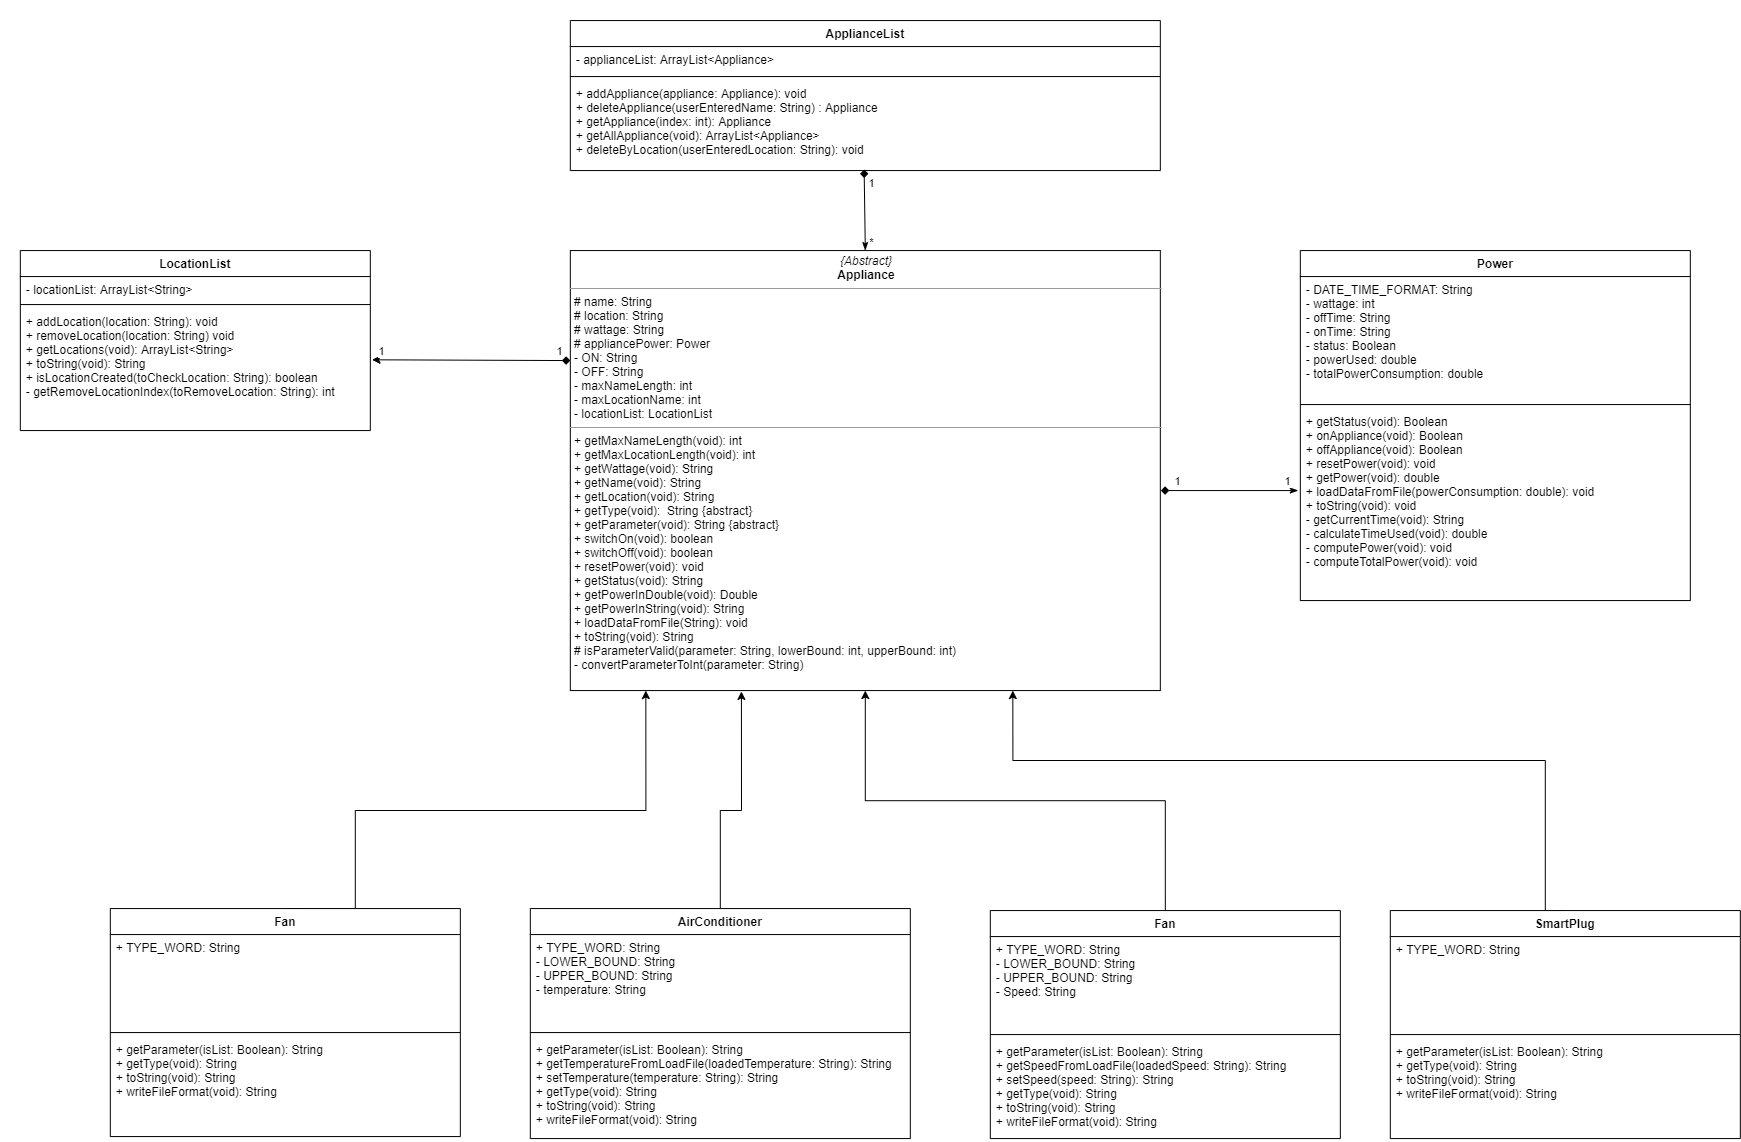
To create an Appliance, we pass the name, location, wattage, power and the entire locationList. We first check from the
locationList if the name of the appliance is inside the locationList, and the location exists within the locationList.
If all these conditions are met, the Appliance will be created. It will be appended into the ApplianceList with the
addAppliance() method.
The Power class is responsible for computing the appliance’s power consumption.
The public methods in the Appliances accessible via the ApplianceList are used to manipulate the appliances such as
turning ON and OFF. From the appliance class, the program will be able to retrieving the name, location, statuses of
the appliances.
Parser Component
This section will describe how the Parser feature is implemented as well as the design consideration and rational.
The main purpose of the Parser Class is to interpret the user inputs so that the correct command can be executed.
Sequence Diagram when parseCommand(userCommandText) is initially called.
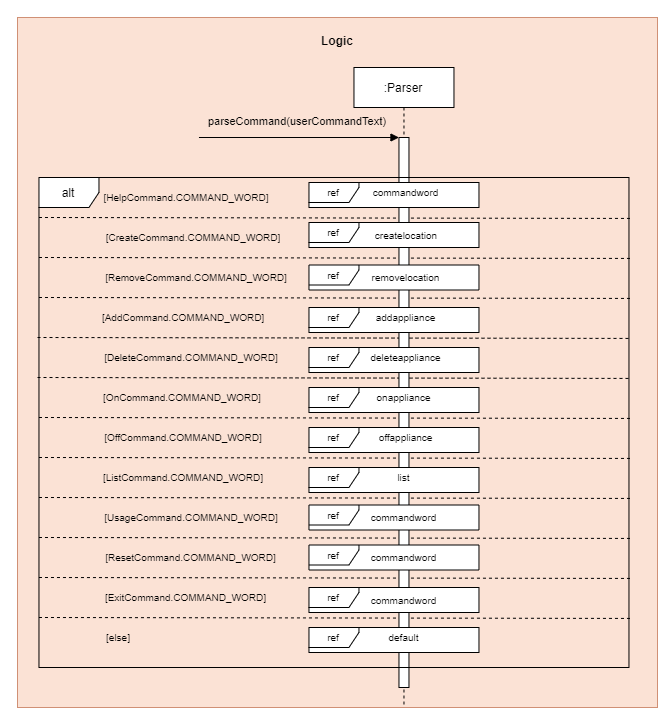
The userCommandText is first capture by TextUi and then passed into parseCommand(userCommandText) method in Parser.
As shown in the Sequence Diagram above, different userCommandText will result in different paths being taken.
Below is the list of commands available.
- Help:
help - Create a location:
create - Remove a location:
remove - Add an appliance:
add - Delete an appliance:
delete - Switch ON an appliance:
on - Switch OFF an appliance:
off - Listing appliance/location:
list - Displaying usage of appliance:
usage - Resetting usage of appliance:
p_reset - Exiting the application:
exit
Sequence Diagram for create
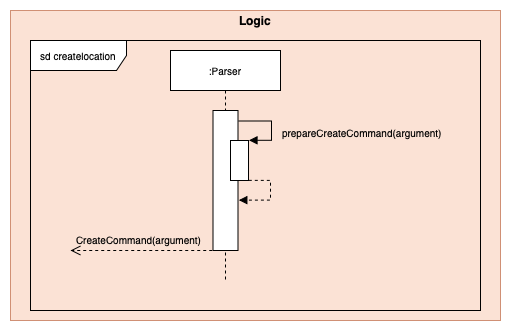
When the user enters the create command, the prepareCreateCommand(argument) is called.
It will reject the input provided by the user if the argument is empty or contain characters such as / or | or if the argument contains spaces in between.
If the argument is not rejected, it will return and construct a new CreateCommand object with argument as the parameter to be created.
Sequence Diagram for remove
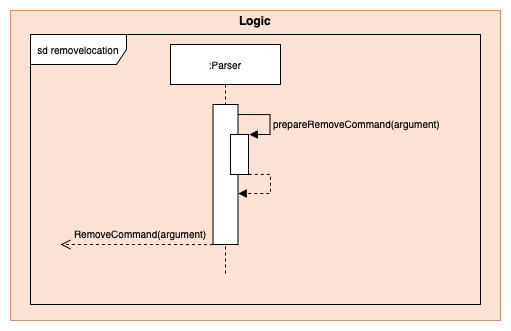
When the user enters the remove command, the prepareRemoveCommand(argument) is called.
It will reject the input provided by the user if the argument is empty.
If the argument is not rejected, it will return a new RemoveCommand object with argument as the parameter to be used to remove a location in the LocationList.
Sequence Diagram for add
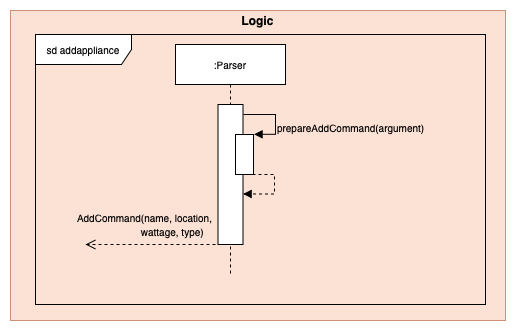
When the user enters the add command, the prepareAddCommand(argument) is called.
It will reject the input provided by the user if the l/[LOCATION_NAME] w/[WATTAGE] t/[APPLIANCE_TYPE] is not in this particular order.
If the argument entered are in the right order, it will split and reject if any of the parameters entered by the user is empty.
Next, it will check to ensure that the [APPLIANCE_NAME] parameter does not contain characters such as / or | or spaces in between and [WATTAGE] is a valid int number from 1-9999.
If all these conditions are fulfilled, it will return and construct a new AddCommand object with name, location, wattage and type as the parameters to be used to add an appliance to the ApplianceList.
Sequence Diagram for delete
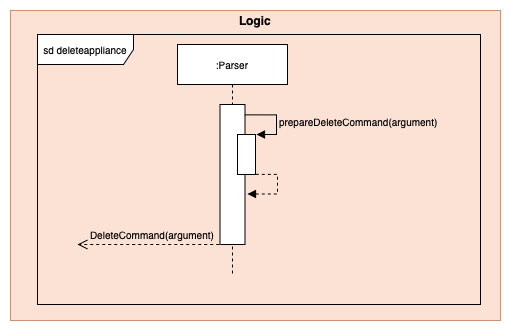
When the user enters the delete command, the prepareDeleteCommand(argument) is called.
It will reject the input provided by the user if the argument is empty. If the argument is not rejected, it will return a new DeleteCommand object with arguments as the parameter to be used to delete an appliance from the ApplianceList.
Sequence Diagram for on
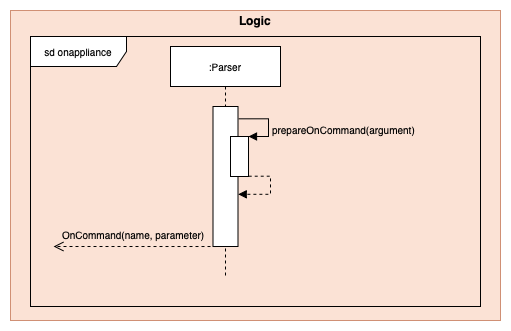
When the user enters the ‘on’ command, the
prepareOnCommand(argument) is called. It will check if the user inputs a p/ for the argument.
The name can either be a Location, or an Appliance name. If there is a parameter, the program will then check if the command is an integer, if it isn’t an error is thrown. If there is no parameter inputted, an empty string. Finally, a new OnCommand(name,parameter) will be returned.
Sequence Diagram for off
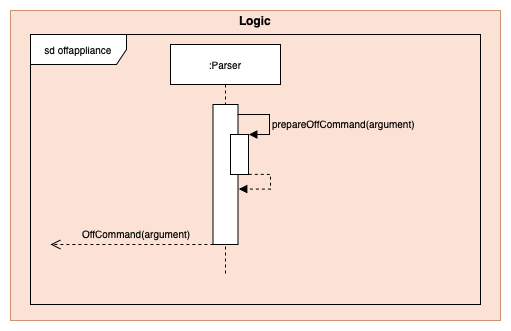
When the user enters the ‘on’ command, the
prepareOffCommand(argument) is called. The name can be an Appliance or a Location. A new OffCommand is created: OffCommand(name) and returned.
Sequence Diagram for list
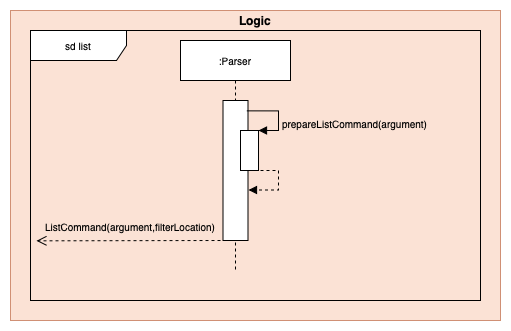
When the user enters the list command, the
prepareListCommand(argument) is called. It will check if the argument contains “appliance’ or ‘location”.
-
If the argument contains “location”, a new
ListCommand(LOCATION_TYPE, ““)will be returned. -
If the argument contains “appliance”, it will check if it contains a “l/” parameter. If it exist, it means there is a filteredLocation, thus a new
ListCommand(APPLIANCE_TYPE, filteredLocation)will be returned. Else, a newListCommand(APPLIANCE_TYPE, ““)will be returned. -
Any argument that do not contain “location” and “appliance” or contains “appliance” with a wrong format will return a
InvalidCommandclass with their respective error messages.
Sequence Diagram for commandword

commandword refers to the following commands help, usage, p_reset, exit.
As these 4 commands does not require any additional parsing. The sequence diagram referred above will return their
respective CommandObject to execute the command.
Sequence Diagram for default
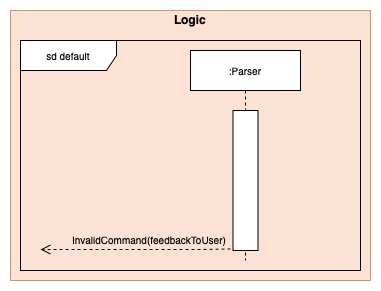
When input provided by the User is not any of the commands available, it will return a new InvalidCommand(MESSAGE_INVALID_COMMAND_FORMAT)
that will be executed to inform the user that it is a ‘Invalid Command Format’.
Command Component
Help Command
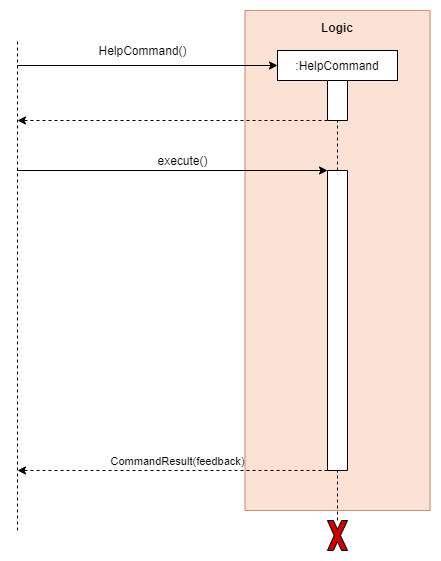
To see the help usage for the commands in SmartHomeBot, the HelpCommand class is used. This class’ object is
first created by the Parser class, where it is then returned to the Main class to have its execute()
function called. When the Main class calls the execute() function, the HelpCommand
will then return a new CommandResult class (which stores the Help message)
The sequence diagram for HelpCommand is shown below:
Create Command
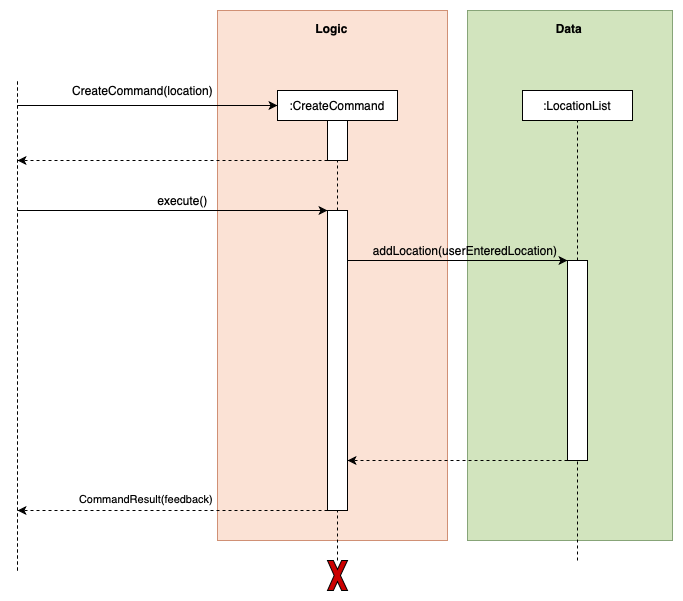
To create a new location, the CreateCommand class is used.
This class object is first created by the Parser class, where it is then returned to the Main class to have its execute() function called.
The userEnteredLocation which was the argument parsed by the Parser will be used in LocationList’s addLocation(userEnteredLocation) function to create the location in the LocationList.
After the location is created, it will then return a new CommandResult class to indicate the result of this process.
If the userEnteredLocation already exists in the LocationList, it will return a new CommandResult class to indicate that the location already exists and could not be created. Likewise, if the userEnterLocation already exists in the ApplianceList, it will return a new CommandResult class to indicate that as such. This is to prevent duplicates name in both the ApplianceList and LocationList.
The sequence diagram for CreateCommand is shown below:
Remove Command
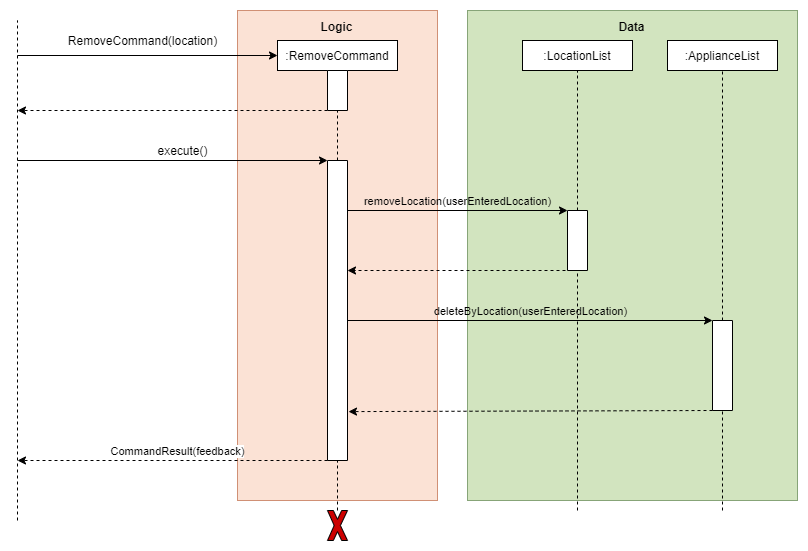
To remove a location, the RemoveCommand class is used. The class object is first created by the Parser class, where
it is then returned to the Main class to have its execute() method called. The name of the location to be removed
will be parsed into the RemoveCommand class. The RemoveCommand class will call the removeLocation method in
LocationList, which will loop until the name of the location to be removed is found in the LocationList.
Next, the RemoveCommand class will call the deleteByLocation method in ApplianceList, which will loop to look for all the appliance in the location to be removed and delete the appliance.
If the name of the location to be removed is not found, the RemoveCommand will return the “Location does not exist.” message.
The sequence diagram for RemoveCommand is shown below:
Add Command
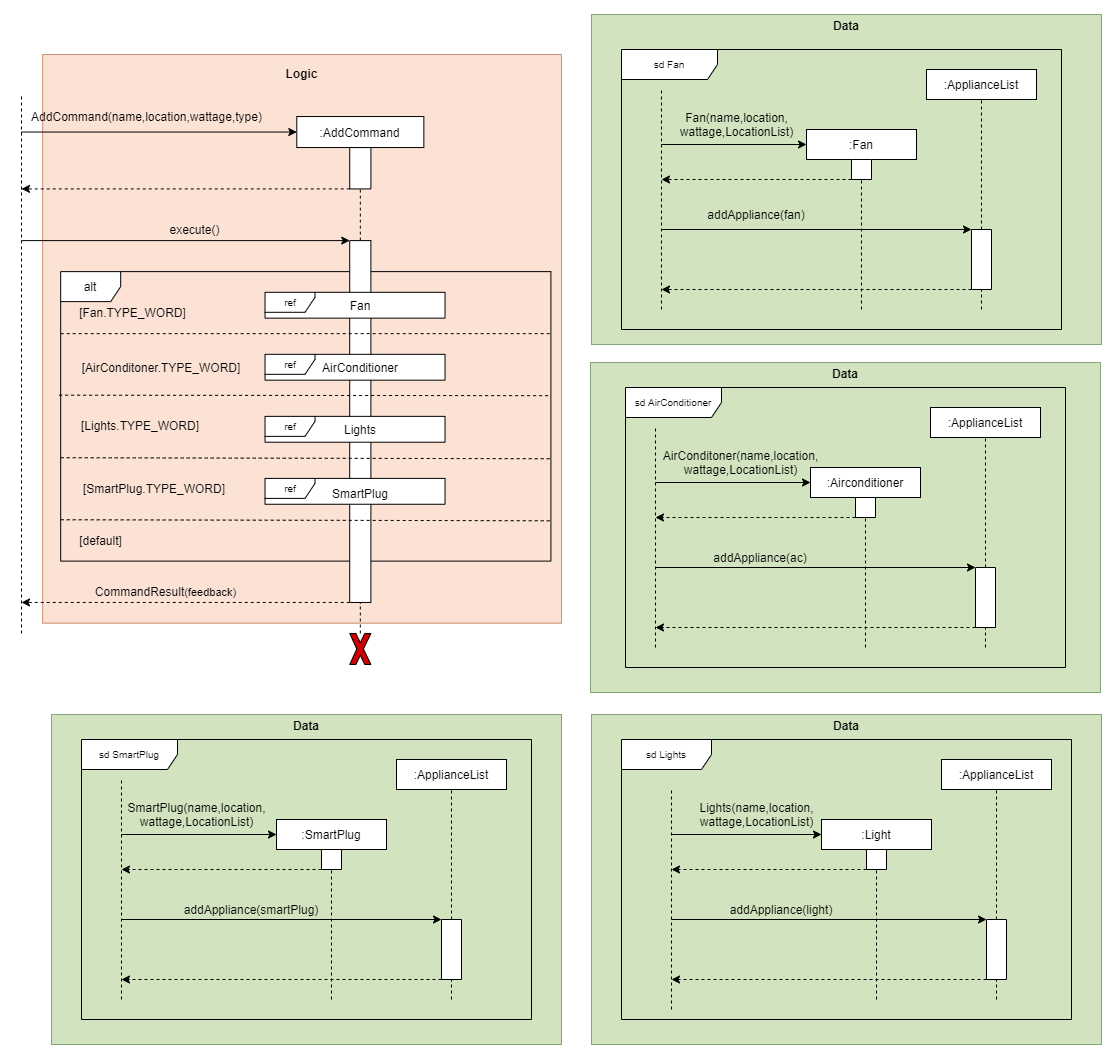
To add a new appliance, the AddCommand class is used. This class object is first created by the Parser class, where
it is then returned to the Main class to have its execute() method called. The name,location,wattage, and type of
the appliance will be parsed into the AddCommand class. The AddCommand class will perform the execute() method to
convert the appliance into static (Fan, AirConditioner, Lights, SmartPlug) depending on their type. Then the
appliance will be added into the ApplianceList. The name of the appliance has to be unique.
The sequence diagram for AddCommand is shown below:
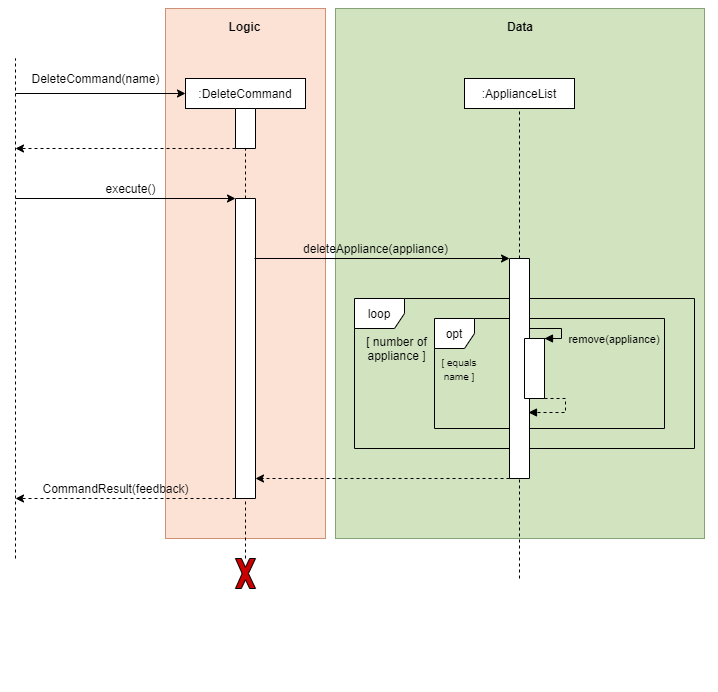
Delete Command
To delete an appliance, the DeleteCommand class is used. This class object is first created by the Parser class
where it is then returned to the Main class to have its execute() method called. The name of the appliance to be
deleted will be parsed into the DeleteCommand class. The DeleteCommand class will call the deleteAppliance method
in the ApplianceList class, which will loop until the name of the appliance to be deleted is found in the
ApplianceList and remove the appliance from the ApplianceList. If the name of the appliance to be deleted is not
found, the DeleteCommand will return “appliance does not exist” message.
The sequence diagram for DeleteCommand is shown below:
On Command
The OnCommand shown below explains the Sequence Diagram of the OnCommand. When the Main class calls the execute() function there will be are 2 cases for on command to flow:
onByLocationonByAppliance
The sequence diagram for OnCommand is shown below:
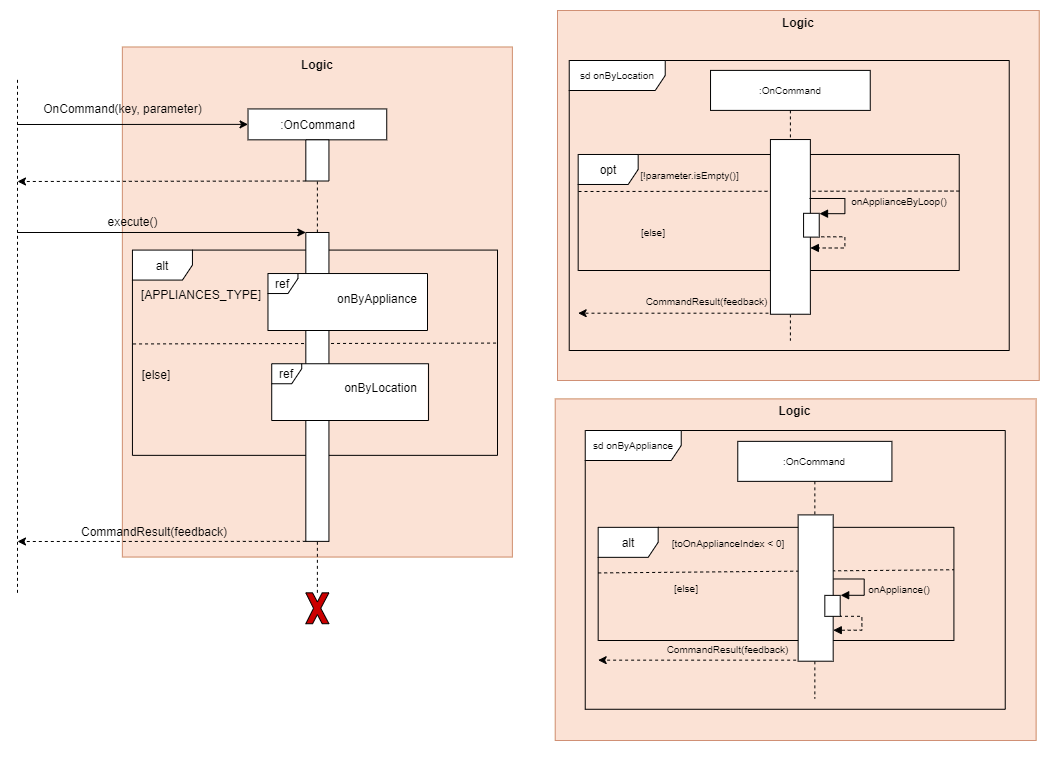
The program will determine if the user inputted: key is a name of an appliance, or a location.This is done by checking
the key in the LocationList, if it exists, the program will deem it as OnByLocation vice versa.
-
onByLocation
The first condition checks if the user types in any parameter into the command, if so, the program will be unable to turn on the appliances in the location. This is done as not all parameters are accepted by every appliance, for example,setTemperatureis only accepted for Air Conditioner. Thus, the parameter option is only opened to theOnByAppliancemethod. Then,onByApplianceLoopwill be called to turn on all appliances in the location. -
onByAppliance
The first condition checks the index of the tagged appliance in the applianceList. If the index is negative, this signifies that that key does not exist in the location or appliance list. Else, we will call theonAppliancemethod.
Off Command
When the Main class calls the execute() function there are 2 cases for off command:
offByLocationoffByAppliance
The sequence diagram for OffCommand is shown below:
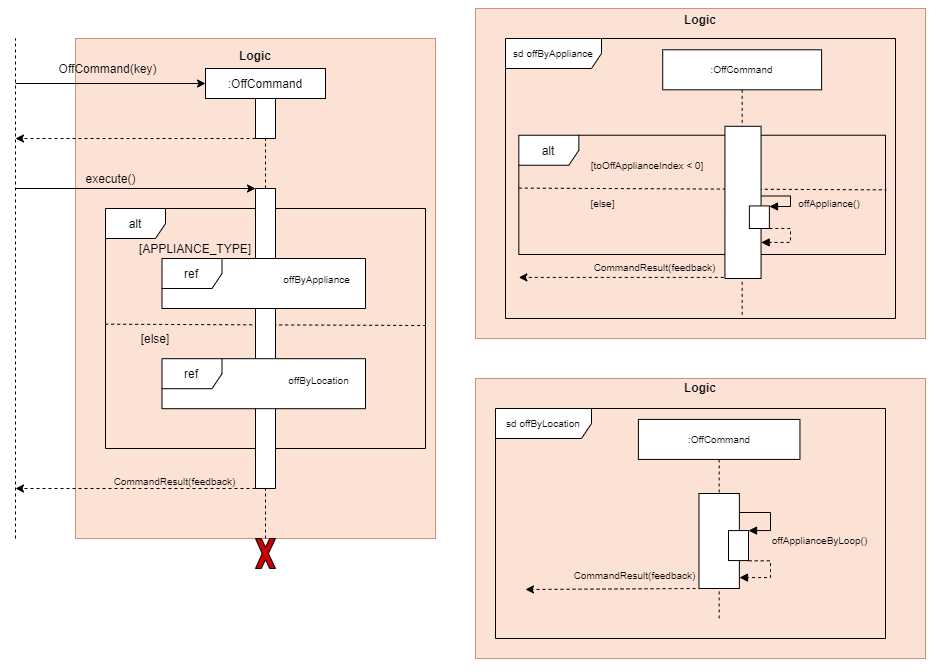
The program will determine if the user inputted: key is a name of an appliance or a location. This is done by checking
the key in the LocationList, if it exists, the program will deem it as OffByLocation vice versa.
-
offByLocation
This method will call offByApplianceLoop which turns off every appliance in that location. -
offByAppliance
The first condition checks the index of the tagged appliance in the applianceList. If the index is negative, this signifies that that key does not exist in the location or appliance list. Else, we will call theoffAppliancemethod.
List Command
To list appliances or locations, the ListCommand class is used. This class’ object is first created by the Parser class,
where it is then returned to the Main class to have its execute() function be called.When the Main class calls the execute()
function, ListCommand will call upon the function “list appliance” or “list location” in ListCommand class to
determine whether to list the appliances or location, then return a new CommandResult class (which stores the list)
The sequence diagram for ListCommand is shown below:
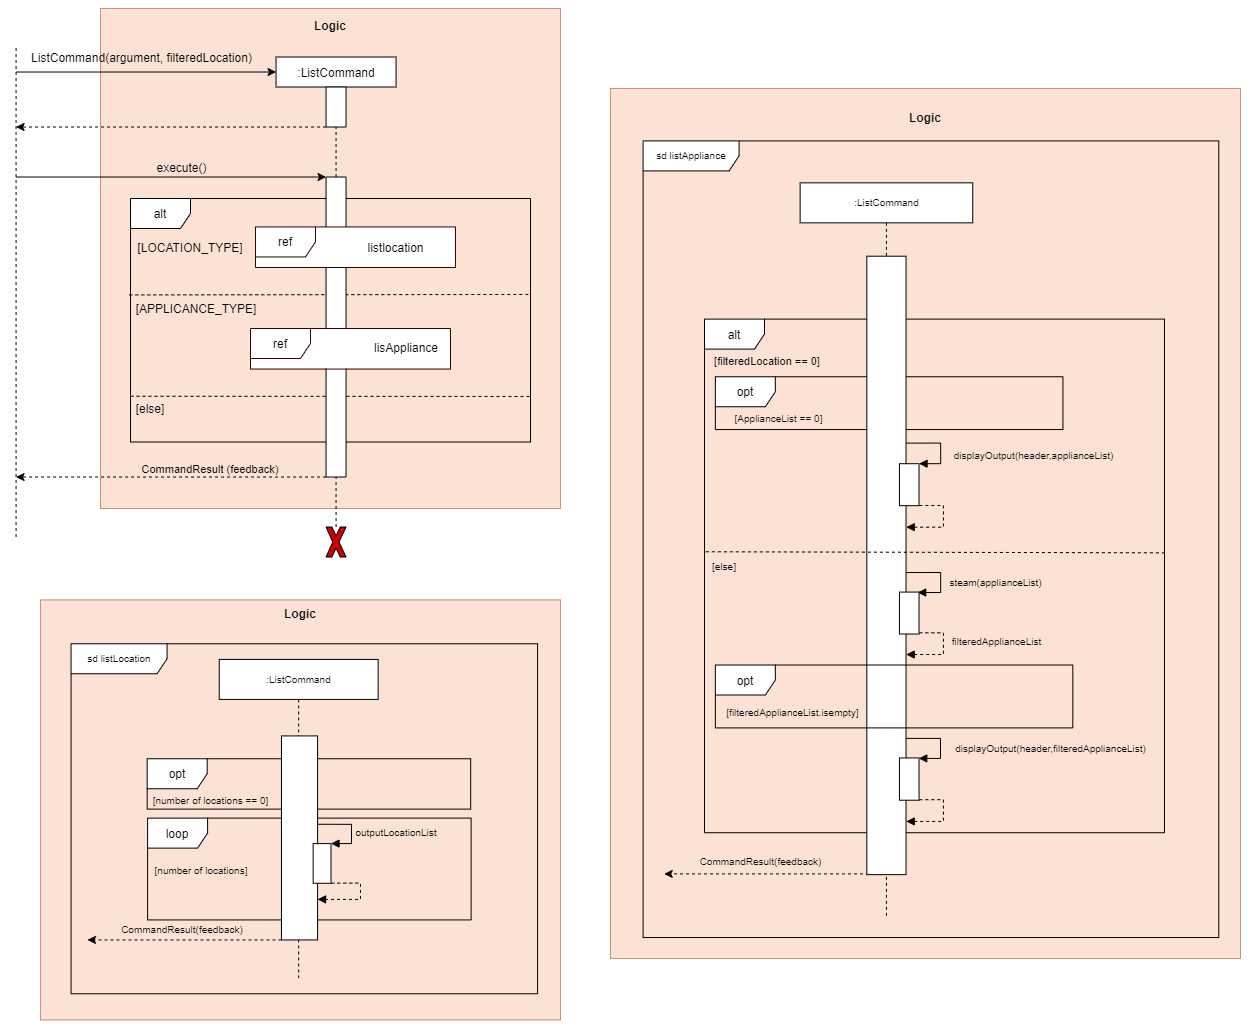
As depicted from the diagram, there are 2 cases for ListCommand:
1) listAppliance
This method checks for the user’s key in a filteredLocation together with the “list appliance”. If there is no filteredLocation,
it will just create a list of all the appliances in all the locations. Vice versa, if it exists a filteredLocation,it will
just create a list of all the appliances in filteredLocation.
2) listLocation
This method creates a list of all the locations that stores in the locationList.
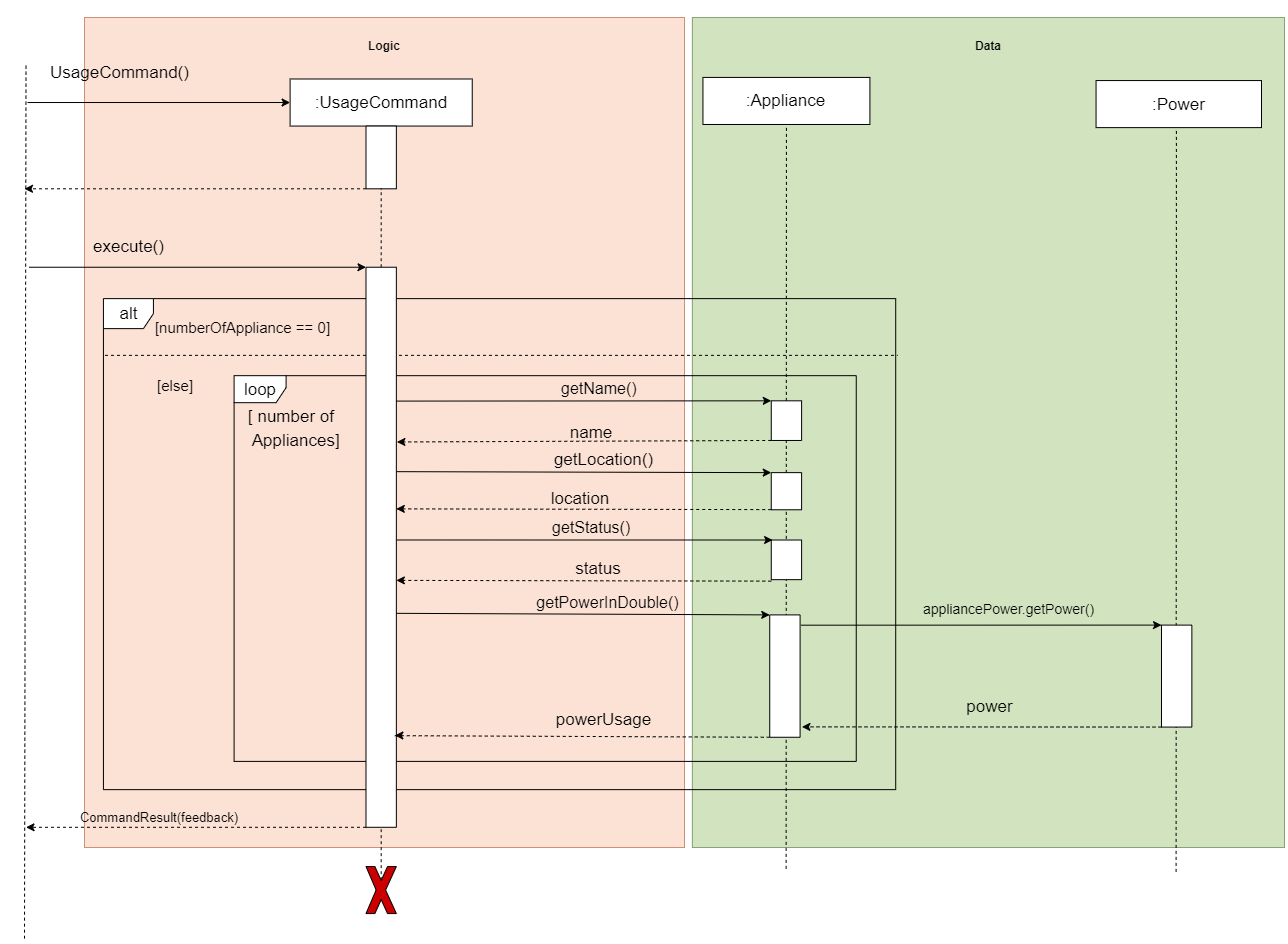
Usage Command
To find out the power consumption of each appliance and total power usage. This class object is first created by the Parser class, where it is then returned to the Main class to have its execute() method called.
When the Main class calls the execute() function, UsageCommand will get the appliance’s details such as name, location, status and power usage as shown in the sequence diagram. Power consumption will be computed based on the appliance usage time with respect to the system time. If the appliance status is on it will get its time used with respect to the current system time. Thus, the power consumption will be calculated and displayed auto-formatted content to the user which returns a new CommandResults class.
The sequence diagram of UsageCommand is shown below when user enters usage:
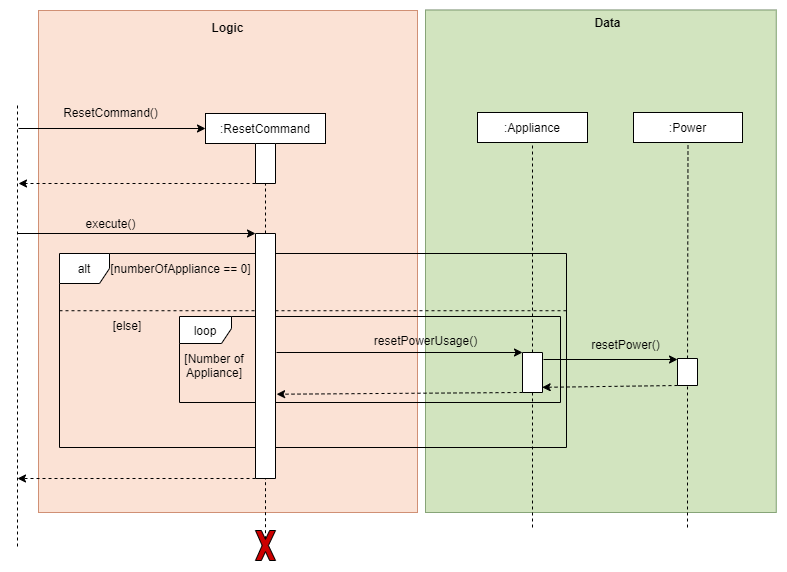
Reset Command
To reset the power consumption of each appliance and total power usage of SmartHomeBot back to zero. This class object is first created by the Parser class, where it is then returned to the Main class to have its execute()
method called. When the Main class calls the execute() function, ResetCommand will then access the power class
and reset the appliance power. A new CommandResult class will be returned to the main with a feedback message.
The sequence diagram of ResetCommand is shown below when user enters p_reset:
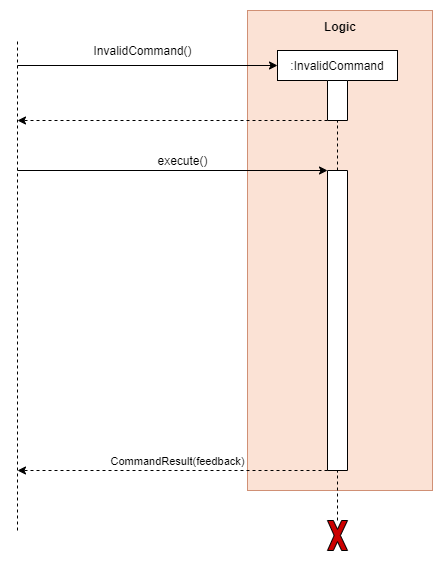
Invalid Command
If users key in the wrong command, the InvalidCommand class is used.This class’ object is
first created by the Parser class, where it is then returned to the Main class to have its execute()
function be called. When the Main class calls the execute() function, InvalidCommand will
return a new CommandResult class (which stores the Invalid message)
The sequence diagram for InvalidCommand is shown below:
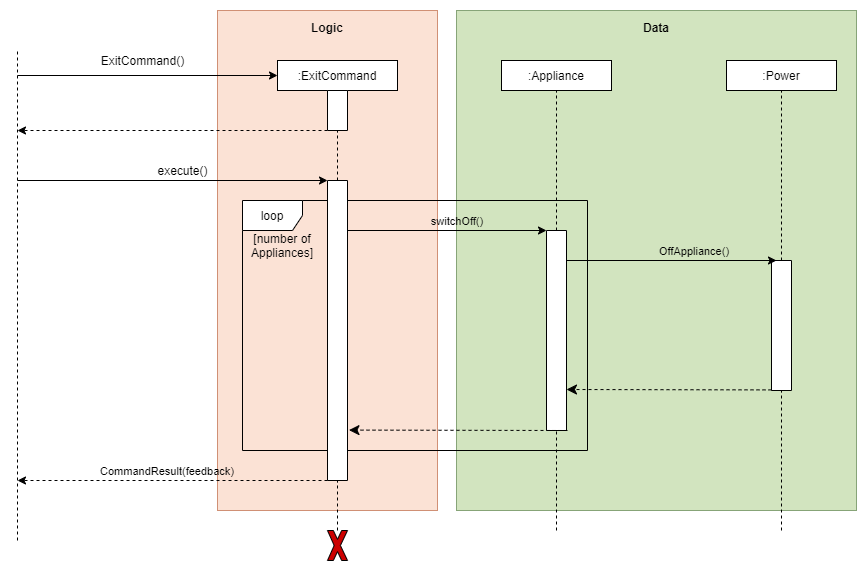
Exit Command
To exit SmartHomeBot, the ExitCommand class is used. For this ExitCommand class. This class’ object
is first created by the Parser class, where it is then returned to the Main class to have its execute()
function be called. When the Main class calls the execute() function, the ExitCommand will off all the
appliance and ,then return a new CommandResult class (which stores the Exit message)
The sequence diagram for ExitCommand is shown below:
CommandResult Command
The CommandResult class is used to store feedback to users and will interact with UI in the Main.
Storage Component
Storage Module
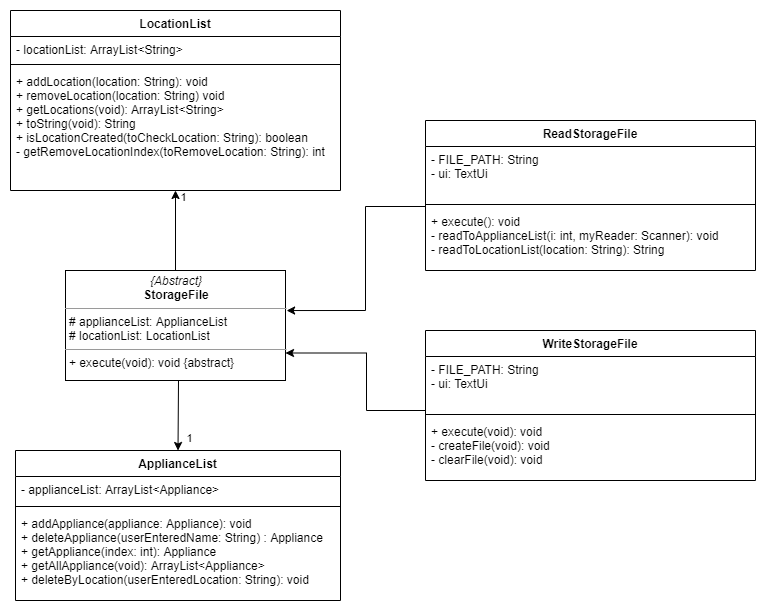
The Storage module manages the load and save operations of the SmartHomeBot. It consist of two different classes,
the ReadStorageFile class, and the WriteToFile class. As of the name stated, the function of WriteStorageFile class
is to store the data into a .txt file for future usage. The ReadStorageFile class is to load the previously stored data
from the .txt file back into the SmartHomeBot when it start up.
The class diagram for storage module is shown below:
Process of writing data into Storage File
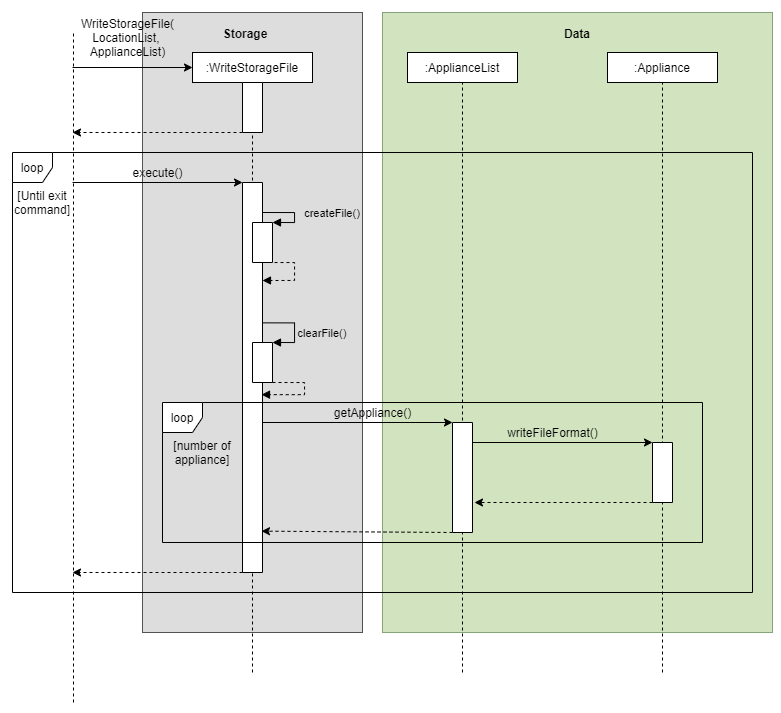
After each command input by the user, SmartHomeBot will perform the execute() method in SaveStorageFile. This allows
the program to continuously save the changes made by the user into the .txt file and prevent the lost of updates made
by the user.
Within the execute() method, the createFile() method will be performed to create a new .txt file if there is no .txt
file exist. Then the clearFile() method will be performed to empty .txt file. After that all the data updated by the
user will be written into the .txt file. This process will be carried out each time the user input a command. The first
line in the .txt file will always be the LocationList and subsequent lines will be all the appliances, each occupying
one line each. The appliances will be written together with their parameters in each line.
The sequence diagram for WriteStorageFile is shown below:
Process of retrieving data back into the program
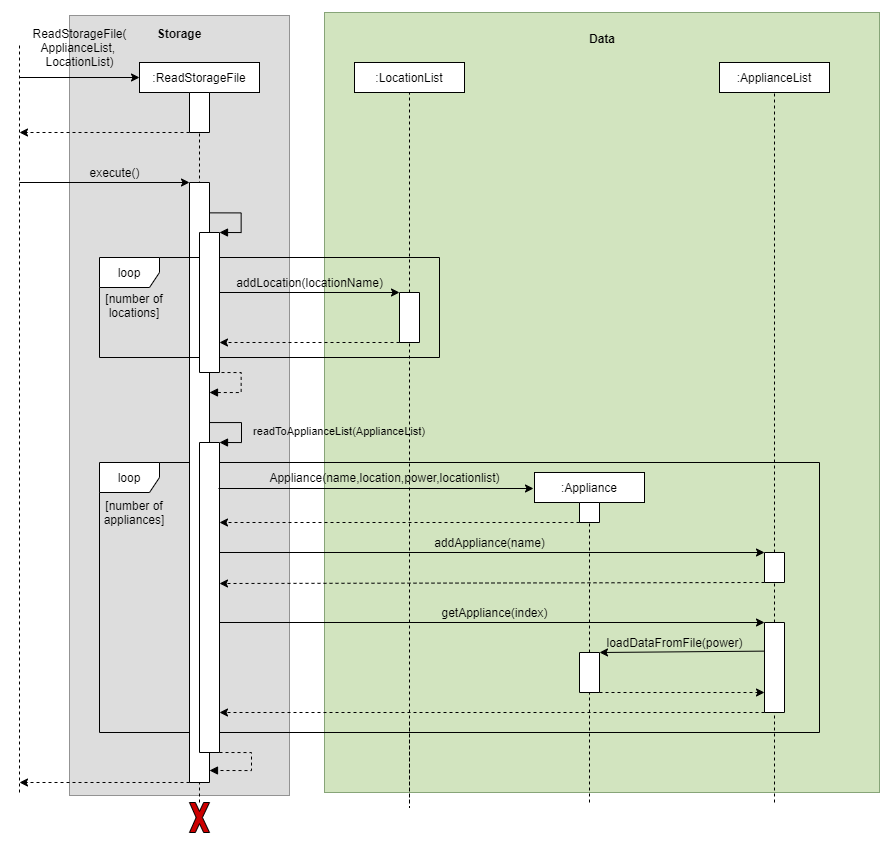
On startup, SmartHomeBot will perform the execute() method in ReadStorageFile. This allows the program to retrieve all
stored data saved previously from the .txt file back into the program to be used again.
Within the execute() method, a Scanner object will be created to parse individual lines in the .txt file back into the
program and converting them into String. The first line parsed into the program will be the locationlist, which will
then be parse into the readToLocationList(locations) method. In the readToLocationList(locations) method, the
locations will be added back into the LocationList one by one. Then the program will return back to execute().
The second line onwards in the .txt file will be the appliances. These appliances will be converted into String and
parse into the readToApplianceList method. In the readToApplianceList(appliance) method, each line will be split up
into their specific parameters(name,location, power, type, powerConsumption and parameter). Then the appliance will be
converted into static (Fan, AirConditioner, Lights, SmartPlug) depending on their types. Then the appliance will
be added back to the ApplianceList. The powerConsumption of each appliance will also be updated to keep track of the
powerUsage of each appliance.
The sequence diagram for ReadStorageFile is shown below:
Appendix A: Product scope
Target user profile
Disabled individuals with mobility issues to perform tasks like switching On/Off Appliances at home. While allowing them to automate/monitor their home with smart home devices.
Value proposition
This program consolidates all the home appliance’s control into a centralised system. Users with mobility difficulties can easily ON/OFF appliances. They can also review and monitor electricity usage; having a clearer picture of their electrical usage patterns. A backlog of the usage can also be recorded.
Appendix B: User Stories
| Version | As a(n) … | I want to … | So that I can … |
|---|---|---|---|
| v1.0 | Inexperienced user | list all the functions of the app | To see what he can do. |
| v1.0 | New user | add new locations into SmartHomeBot | Tag these locations into appliances |
| v1.0 | New user | add new appliances | Manipulate and view his appliances usage |
| v1.0 | disabled user | On/Off appliances | Turn on and off appliances without moving much |
| v1.0 | Lazy user | list all the appliances in SmartHomeBot | Remove unnecessary locations and appliances |
| v1.0 | Calculative user | View usage of his appliances | View all the appliances and see their status |
| v2.0 | Lazy user | Change the temperature of the air-conditioner and the speed of the fan from SmartHomeBot | Monitor his smart home appliances |
| v2.0 | Experienced SmartHomeBot user | On/OFF appliances by location and list appliances by location | Easily view and manipulate appliances by location |
Appendix C: Non-Functional Requirements
-
Should work on any mainstream OS as long as it has Java 11 or above installed.
-
Should be able to hold up to 1000 appliances without a noticeable sluggishness in performance for typical usage.
-
A user with above average typing speed for regular English text (i.e. not code, not system admin commands) should be able to accomplish most of the tasks faster using commands than using the mouse.
Appendix D: Glossary
Mainstream OS
Windows, Linux, Unix, OS-X
Home appliance details
House appliance that meant to be recorded and use with SmartHomeBot
Appendix E: Instructions for Manual Testing
Given below are instructions to test the application manually.
Starting the program:
i. Download the jar file from the latest release and copy into an empty folder
ii. Run the jar file with java -jar SmartHomeBot.jar
    Expected: Shows the GUI with some welcome messages.
Creating new location:
Prerequisites: List all appliances and locations using the list location and list appliance command.
Making sure the name of the new location is not found in both the list.
- Test case:
create Bedroom1
Expected-printout: Creating Location “Bedroom1”…..CREATED! - Test case:
create Bedroom|2
Expected-printout: Illegal Character space or / or | detected in [LOCATION_NAME]. - Test case:
create
Expected-printout: Empty Parameter detected! Please follow format and enter required parameters.
Removing existing location:
Prerequisites: List all locations using the list location command.
Making sure the name of the location is found in the list.
- Test case:
remove Bedroom1
Expected-printout: Removing LOCATION “Bedroom1”……REMOVED! - Test case:
remove
Expected-printout: Empty Parameter detected! Please follow format and enter required parameters. - Test case:
remove Balcony, assumeBalconywas not created.
Expected-printout: Location does not exist. Nothing will be deleted.
Adding new Appliance:
Prerequisites: List all appliances and locations using the list location and list appliance command.
Making sure the name of the new appliance is not found in both the list.
- Test case:
add Light l/Bedroom1 w/10 t/light
Expected-printout: ADDING Light(10W), located at Bedroom1 ……ADDED! - Test case:
add Light 2 l/Bedroom1 w/10 t/light
Expected-printout: Illegal Character space or / or | detected in [APPLIANCE_NAME]. - Test case:
add Light_2 w/10 l/Bedroom1 t/light
Expected-printout: Please follow this order, add NAME l/[LOCATION_NAME] w/[WATTS] t/[TYPE_OF_APPLIANCE] - Test case:
add Light_2 l/Bedroom2 w/10 t/light, as Bedroom2 was not created as a location.
Expected-printout: Location does not exist. - Test case:
add Light_2 l/Bedroom1 w/10000 t/light
Expected-printout: Appliance wattage is not supported. Please enter between 1 to 9999. - Test case:
add Light_2 l/Bedroom1 w/5000 t/yellowbulbs
Expected-printout: Invalid appliance type is detected. Only aircon, fan, light and smartplug are accepted as type.
Deleting existing appliance:
Prerequisites: List all appliances using the list appliance command.
Making sure the name of the appliance is found in the list.
- Test case:
delete Light
Expected-printout: Deleting Light(10W), located at Bedroom1 …….DELETED. - Test case:
delete
Expected-printout: Empty Parameter detected! Please follow format and enter required parameters. - Test case:
delete Light2, assumeLight2was not added.
Expected-printout: Light2 does not exist.
Switching On Appliance:
Prerequisites:
Ensure that Bedroom1 is created: create Bedroom1 and ac Appliance is added: add ac l/Bedroom1 w/5000 t/aircon.
- Test case:
on ac
Expected-printout: Switching ac(5000W), located at Bedroom1 @ 25 Degrees…..ON - Test case:
on ac2
Expected-printout: Appliance or Location does not exist in the list. - Test case:
on ac p/
Expected-printout: Empty Parameter detected! Please follow format and enter required parameters. - Test case:
on ac p/21, assumeacwas not on.
Expected-printout: Switching ac(5000W), located at Bedroom1 @ 21 Degrees…..ON - Test case:
on Bedroom1, assumeacwas on.
Expected-printout: All Appliances in “Bedroom1” are turned on - Test case:
on ac p/hundred
Expected-printout: Please enter a valid numerical value.
Switching Off Appliance:
Prerequisites:
Ensure that Bedroom1 is created: create Bedroom1 and ac Appliance is added: add ac l/Bedroom1 w/5000 t/aircon. Lastly, ensure that ac is turned on for every test: on ac
- Test case:
off ac
Expected-printout: Switching: ac(5000W), located at Bedroom1 ……OFF - Test case:
off ac2
Expected-printout: Appliance or Location does not exist in the list. - Test case:
off ac p/21
Expected-printout: There should be no parameter for this command, please refer to ‘help’ command. - Test case:
off Bedroom1
Expected-printout: All Appliances in “Bedroom1” are turned off
Listing Appliances or Locations
- Test case:
list location, assume no location is created.
Expected-printout: There is currently no Location in the list. - Test case:
list appliance, assume no appliance is added.
Expected-printout: There is currently no Appliance in the list. - Test case:
list Bedroom1, onlylist applianceorlist locationorlist appliance l/[LOCATION_NAME]is valid for command.
Expected-printout: Please enter either ‘list appliance’ or ‘list location’ or ‘list appliance l/[LOCATION_NAME]’ - Test case:
list appliance l/Bedroom1, assume thatBedroom1is not created
Expected-printout: Location: “Bedroom1” does not exist. - Test case:
list appliance l/Bedroom1, assume thatBedroom1is created but no Appliance is added toBedroom1.
Expected-printout: There is no Appliance in “Bedroom1”.
Saving data to disk
Dealing with missing data files:
When the program is started for the first time, the directory “data” and the text file “data/SmartHomeBot.txt” should be automatically created to store all the data when the user start entering commands into the application. There are two ways that will cause missing data files:
- When the “data” directory folder is missing.
- When the text file “data/SmartHomeBot.txt” is missing from the “data” directory folder.
These can be stimulated by deleting either the “data” directory folder or the text file “data/SmartHomeBot.txt”.
Expected-printout: Load File does not exist. No contents will be loaded.
Dealing with corrupted data files:
Corrupted data files usually happen when some of the appliance parameters are missing from the .txt storage file. When corrupted data files error occurred, some of the data will not be loaded back into the program when the program start up the next time.
This can be stimulated by removing one of the appliance parameters(Example: the power of the appliance) from the
text file “data/SmartHomeBot.txt”.
Expected-printout: Data file is corrupted, some data entry will not be entered.